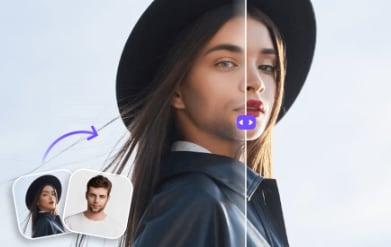
Do you ever wish to know how you would look as the opposite gender? Whether it’s a part of self-exploration or just to prank and play with gender swap, there is a solution for this.
You can easily gender-swap in Photoshop in a few clicks with its powerful photo editing capabilities. No matter if you’re a man or a woman, photoshop gives you precise control over swapping your gender.
This article will tell you all about how the Photoshop gender swap works. We will also walk you through a step-by-step guide so you can transform yourself into anyone you’ve ever wanted to be.
In this article
Part 1. What is Photoshop’s gender swap?
Gender swap in Photoshop lets you manually edit your face over another photo. If you are a man you can place your face over a woman’s body and vice versa. The cool part about changing your gender with Photoshop is that you have full control over it.
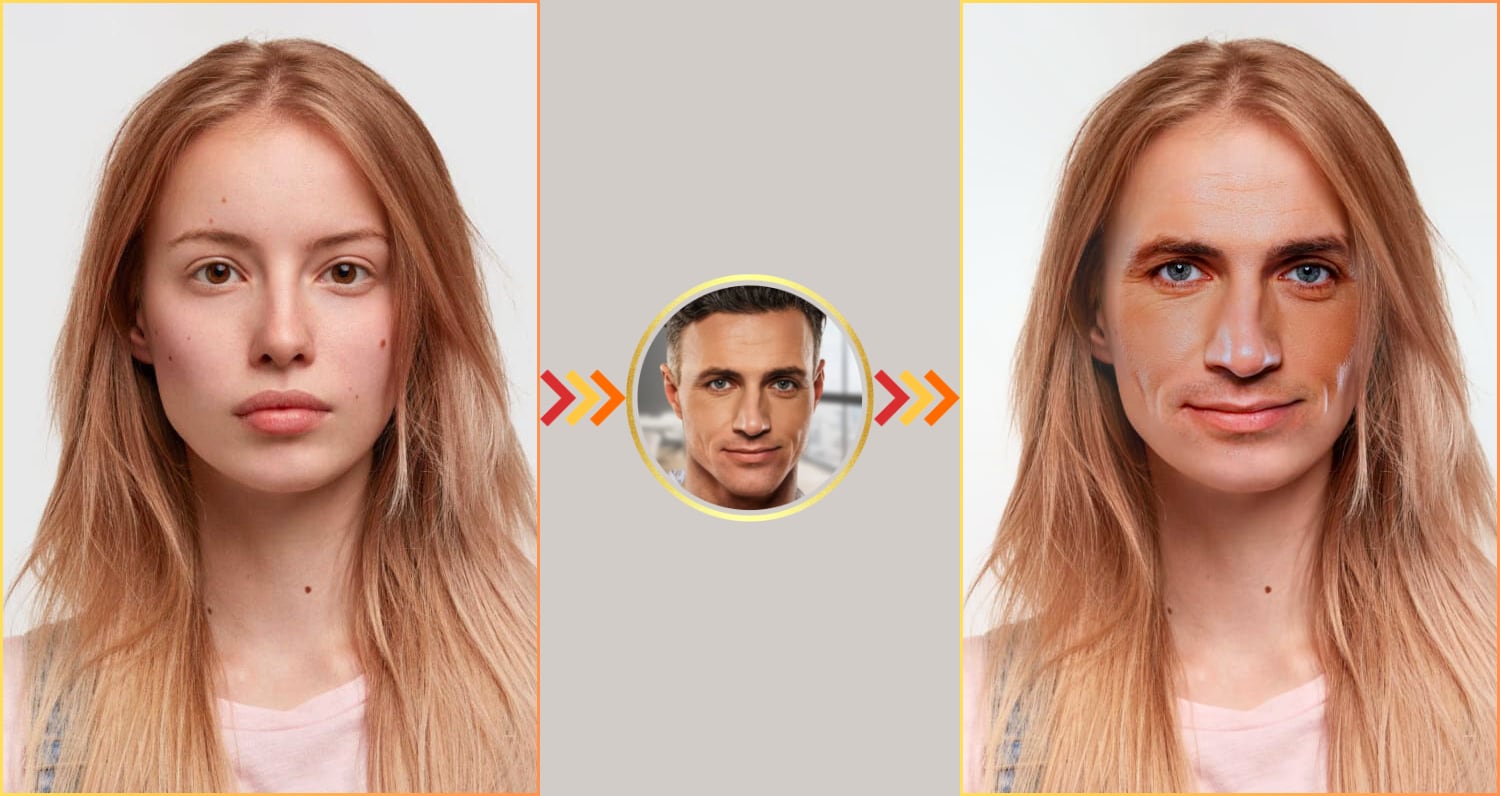
You can simply copy a face from one photo and paste it as a layer over another. It is as simple as that. Then you can further adjust the layers so that it looks as natural as possible. An example of this, you can see below.

If you are a regular user of Photoshop, you’ll have no difficulty swapping any type of face regardless of the color and brightness. However, for beginners, it would be difficult to achieve natural results if images don’t match in lighting. Here is an example of one such gender swap with Photoshop.
Knowing the versatile ways to swap gender with Photoshop, let’s move forward and find out how to use it.
Part 2. How to gender swap in Photoshop step-by-step guide
First, select a male and a female image with bright light and minimal shadows on the face. For convenience, we will name them a “Girl” and a “Boy” image. Open the images with Photoshop and use the instructions below to swap your gender with this tool.
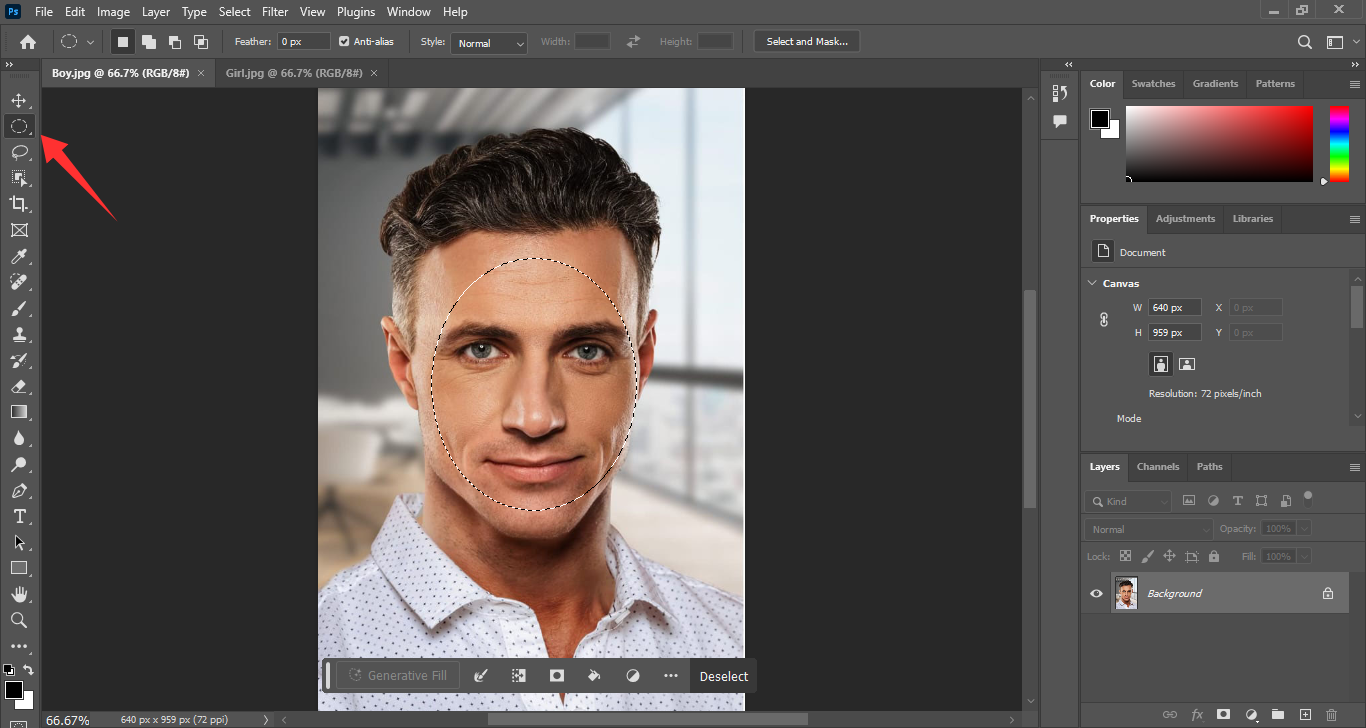
Step 1. Select the “Elliptical Marquee Tool” from the left Toolbar panel and use it to select the main part of the face from the Boy image.
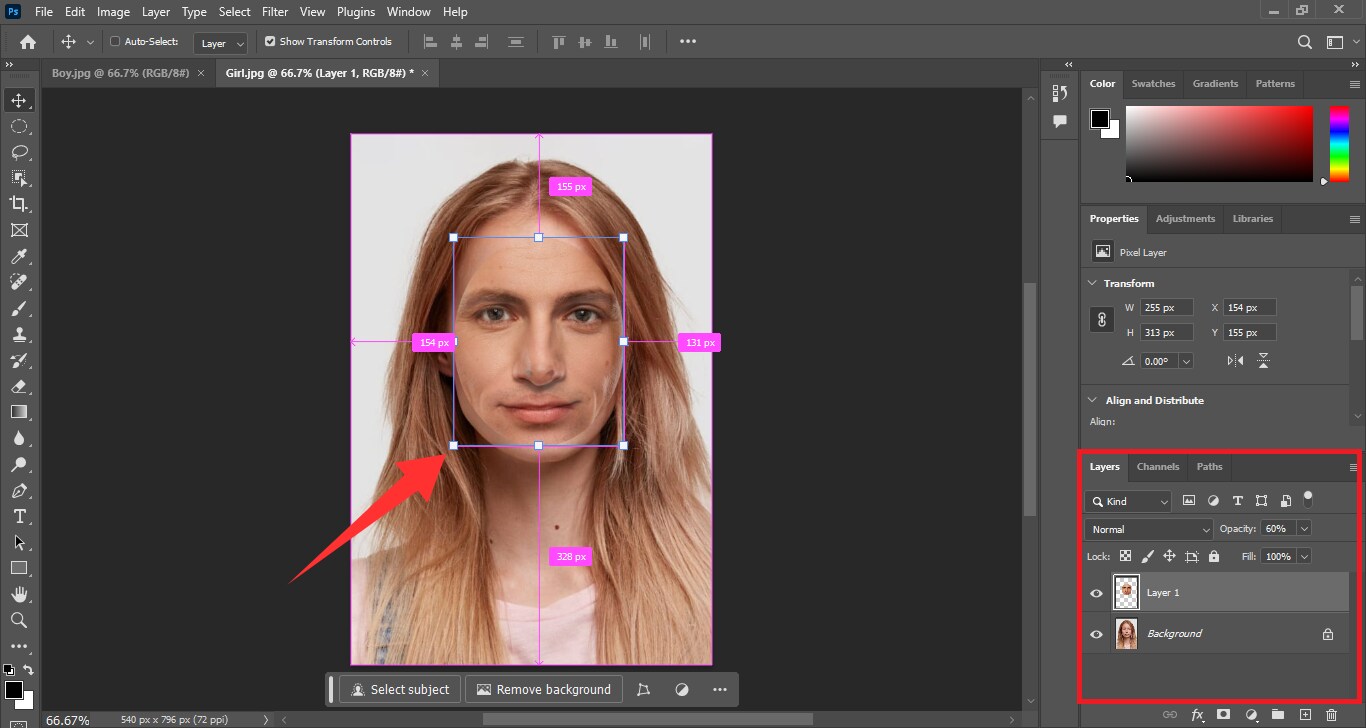
Step 2. Copy-paste the selection over the Girl image and reduce its opacity to 60%. Then, select the “Move Tool” from the left Toolbar panel. Drag the corner of the Scale box to adjust the layer size.
Step 3. Now, reset the opacity to 100%. Select the “Elliptical Marquee Tool” and CTRL + left-click on the (Boy) layer 1 to reselect the face.
Step 4. Go to the “Image” tab and choose “Adjustments. Then click on “Match Color” and set the “Source” as the Girl image and “Layer” as the Background.
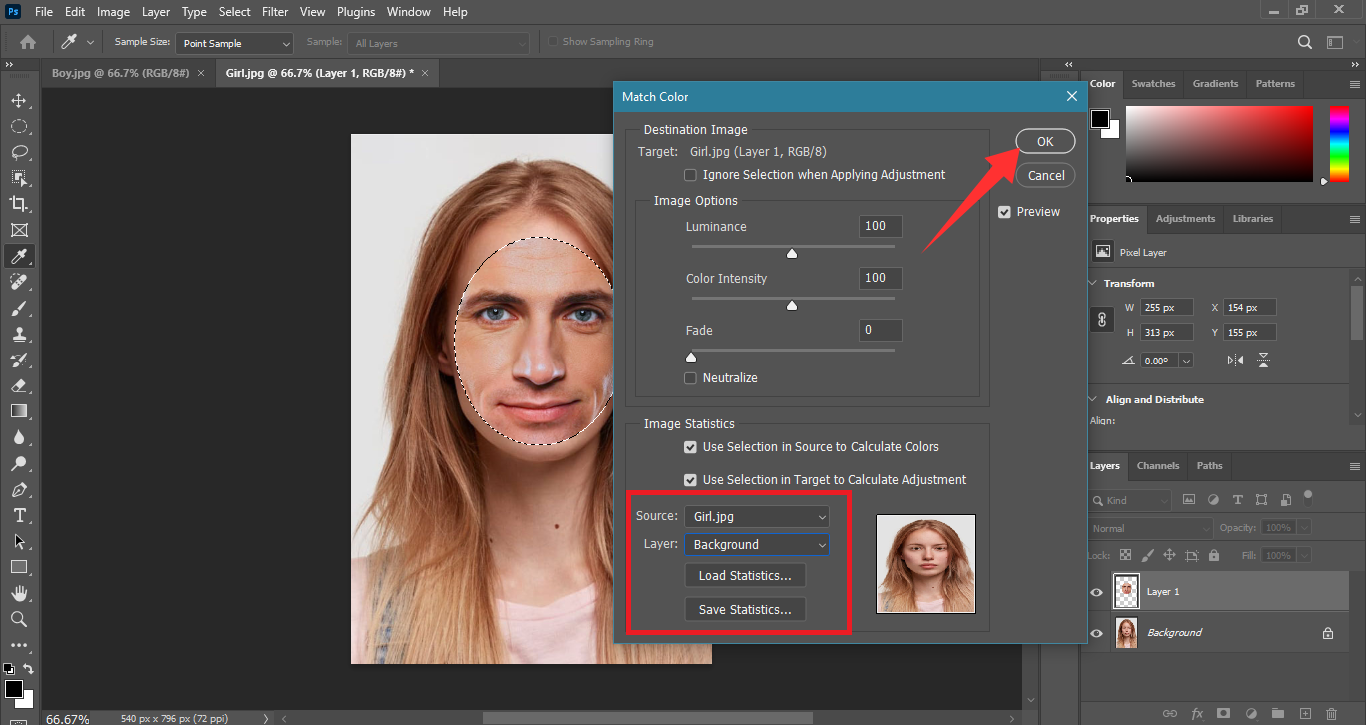
Step 5. Duplicate the (Girl) Background layer and toggle its visibility off. Select the duplicated layer and go to “Select > Modify> Contract.” Choose 6 pixels to contract by and click “OK”.
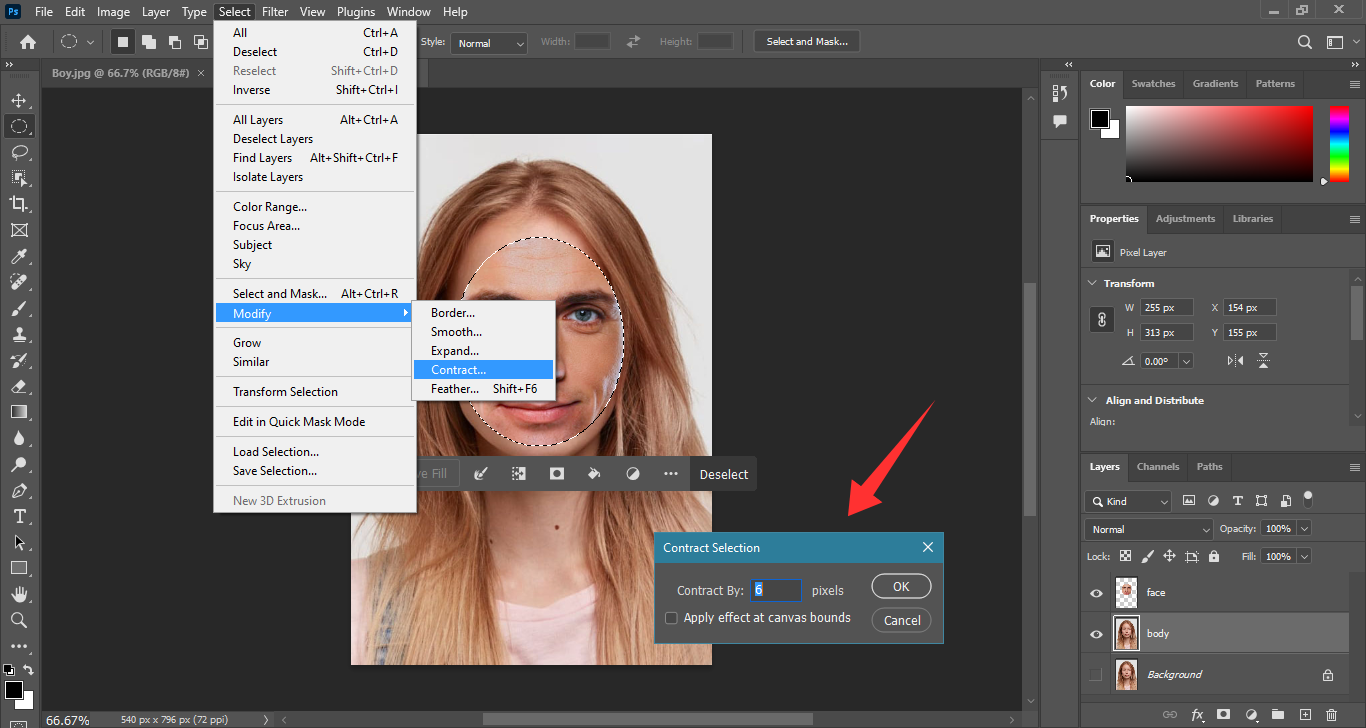
Step 6. Now, hit the delete key to delete the selected area from the body layer. Then, select both the body and face layer. Go to “Edit and choose Auto-Blend Layers.”
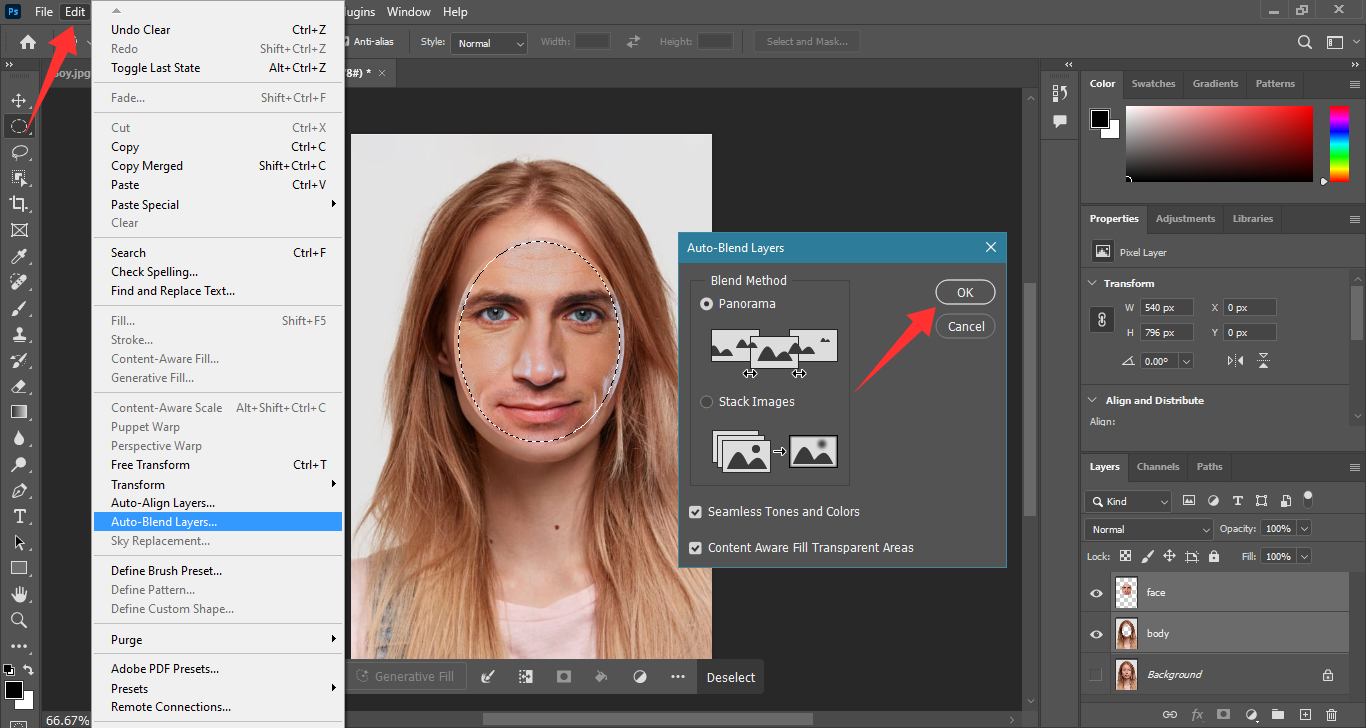
That’s it now you have successfully gender-swapped a photo with Photoshop.
Bonus Tips: Swap Full Body Using Photoshop
When talking about gender swaps with Photoshop we cannot overlook the possibility of full body swaps. Apart from your gender, you can change your entire look by placing your face over another photo. The process of this is the same as mentioned earlier.
Only this time, you will be focusing on choosing an image with your ideal body shape. Then, copy and paste your face over the photo and you’re good to go.
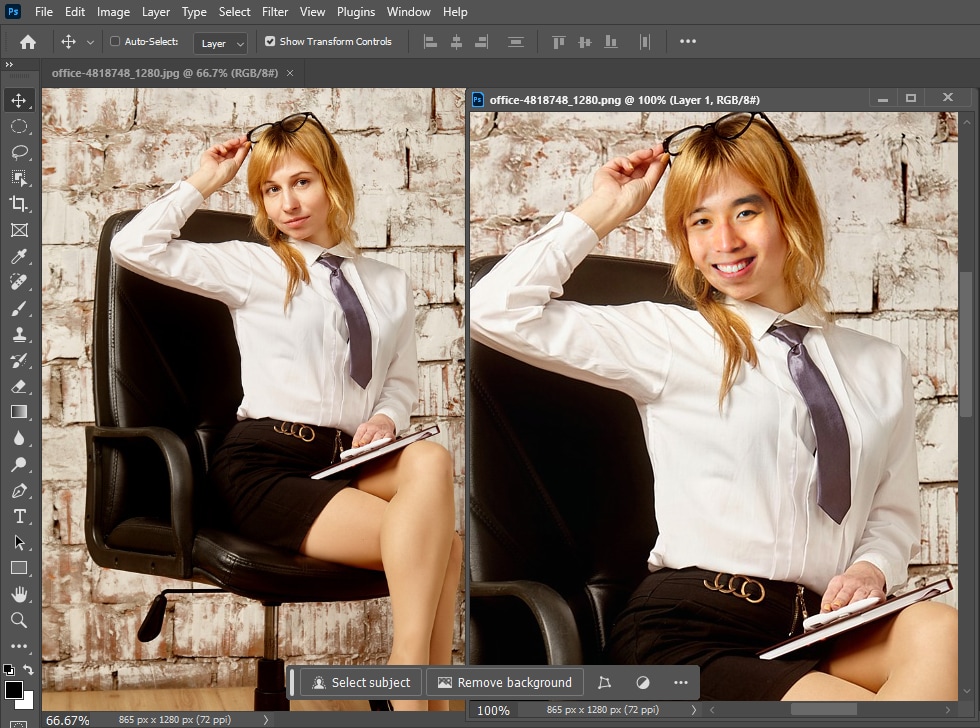
Let’s look at some tips to enhance your full-body gender swaps with Photoshop.
- Start with High-Quality Images
- Choose Frontal Face Images
- Use the Right Tools
- Focus on the Key Areas of the Face
- Use the Auto-Blend Tool
Before you start with the gender swaps, make sure that both of the images are of high quality. Look for images with similar brightness, contrast, shadows, and colors to save the time spent on post-swap adjustments.
When selecting the photos for the full-body Photoshop gender swaps, avoid the images with complex poses. Choose Frontal faces to place over the photo for ease during the editing process.
From Layer Masks and Clone Stamp tool to the Object Selection, Photoshop offers a variety of ways for full body gender swaps. Choose the one that is better suited for the pose and lighting in your images.
When using the Object Selection tools, focus on the distinguishing features such as eyebrows, eyes, nose, lips, etc. You can skip the hair as they may have issues with auto-blending the layers.
After swapping the faces, you can ensure a seamless finish by using Photoshop’s Auto-blend Layers tool. It will erase all the harsh edges of the layers, removing the need for manual blurring.
So there you have it! These tips can ensure a great full-body gender swap with Photoshop. However, the technical steps and the lengthy process of manual editing make it quite inconvenient. Especially beginners may find it difficult to navigate. Now, let’s move on and explore the pros and cons of using Photoshop.
What are the Pros and Cons of Photoshop Gender Swap
Using Photoshop or similar software to perform a gender swap, also known as gender-bending or gender transformation, can have various implications. Here are some pros and cons:
Overall photoshop may be a complicated and time-consuming way to gender swap. However, a plus for the app is that you can swap your full body as well.
Lucky for you, there is a hassle-free way to swap your full body without Photoshop. It’s powered by AI. Keep reading to explore more of this tool.
Part 3. How to put a face on another body without Photoshop (quick and easy)
When seeking quick gender swaps without any technical procedures, FaceHub offers the best solution! Powered with AI, this versatile tool delivers one-click photo and video transformations.
Compared to Photoshop you don’t need to go through hours of complex manual editing. FaceHub is Photoshop’s gender change online alternative that automatically swaps your face and body in a single click. You can use it to change your gender in portraits, personal photos, and videos or from several free templates!

The cool part is that you can even visualize your gender-swapped pictures as an anime character. Despite being an online platform, FaceHub works super fast providing realistic outputs within seconds!
Key Features of FaceHub
- One-click gender swaps: Simply choose a photo for face swap and upload the picture of your face, FaceHub automatically detects and swaps your face!
- Super fast processing: FaceHub provides instant face swaps in seconds regardless of the size of your images.
- Powerful facial recognition: It uses 106 facial key points to accurately recognize your face, skin color, and even gender for highly accurate face swaps.
- Create multiple face swaps: FaceHub lets you face swap multiple faces in your group photos within as short as 2.25 seconds.
- Free templates and samples: FaceHub offers various free faces and built-in photo and video templates to use for powerful gender swaps.
Knowing all the capabilities of FaceHub, are you ready to use this creativity powerhouse for quick face swaps? Let’s find out how to use it in simple steps!
Steps for Seamless Gender Swaps with FaceHub
First, go to FaceHub’s official website. Then use the following instructions to create powerful gender swaps with this tool.
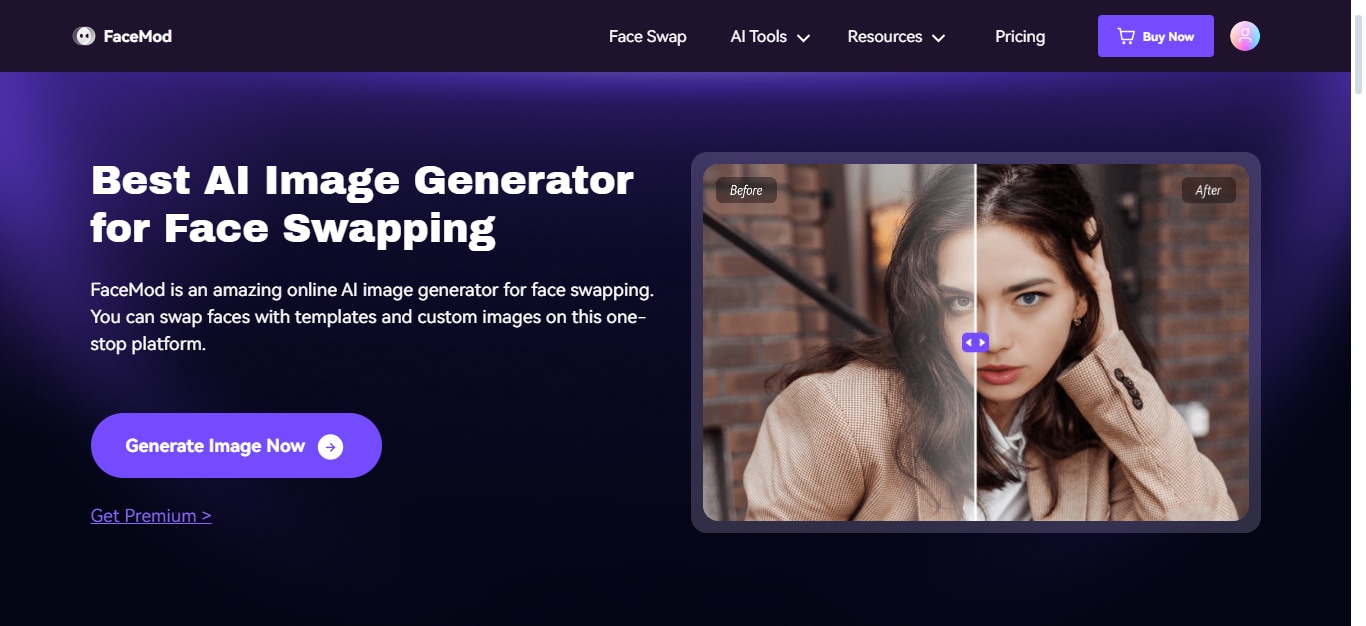
Step 1. To start, click on “Sign Up” and create an account with FaceHub. Then, select the “AI Image Generator” tool from “AI Tools” and click “Generate Image Now” to start.
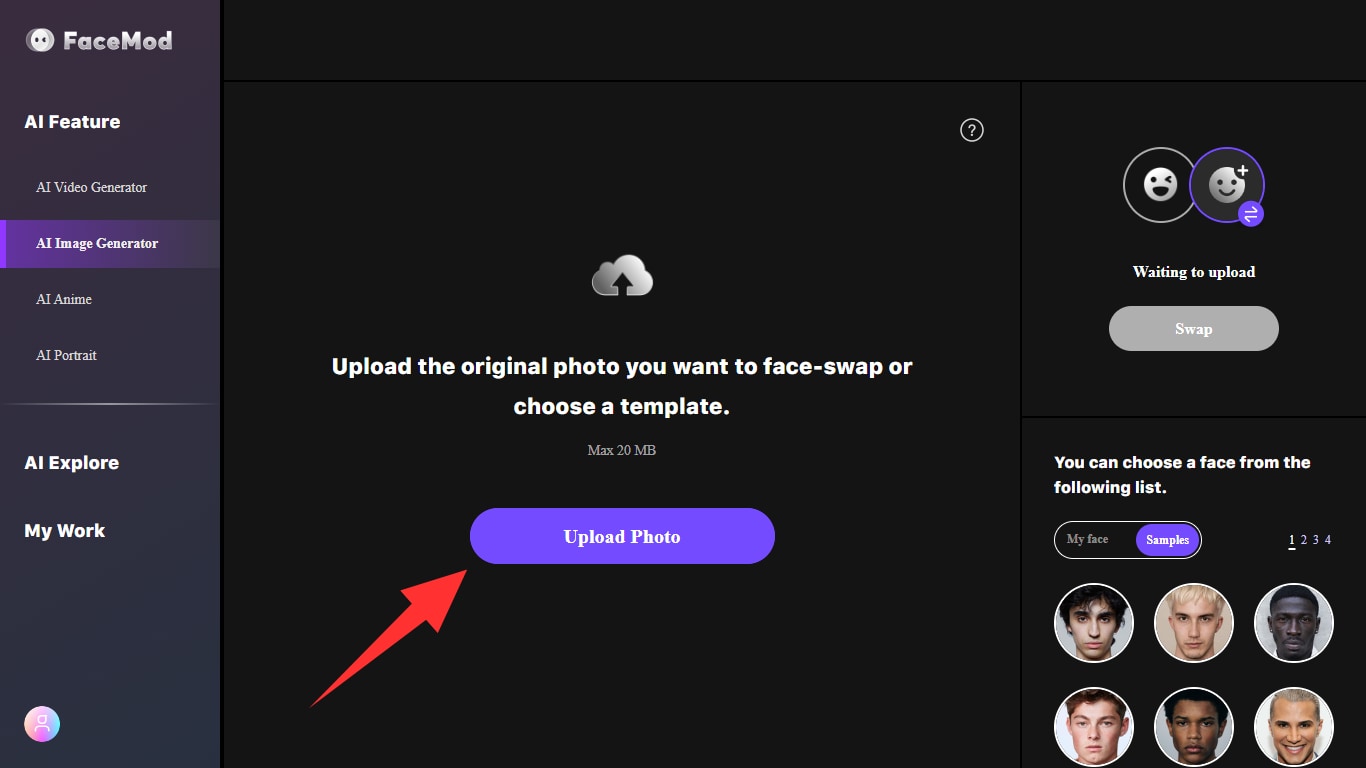
Step 2. Once you have opened the interface for the AI Image Generator, click on “Upload Photo.” Then import the source photo for the gender swap.
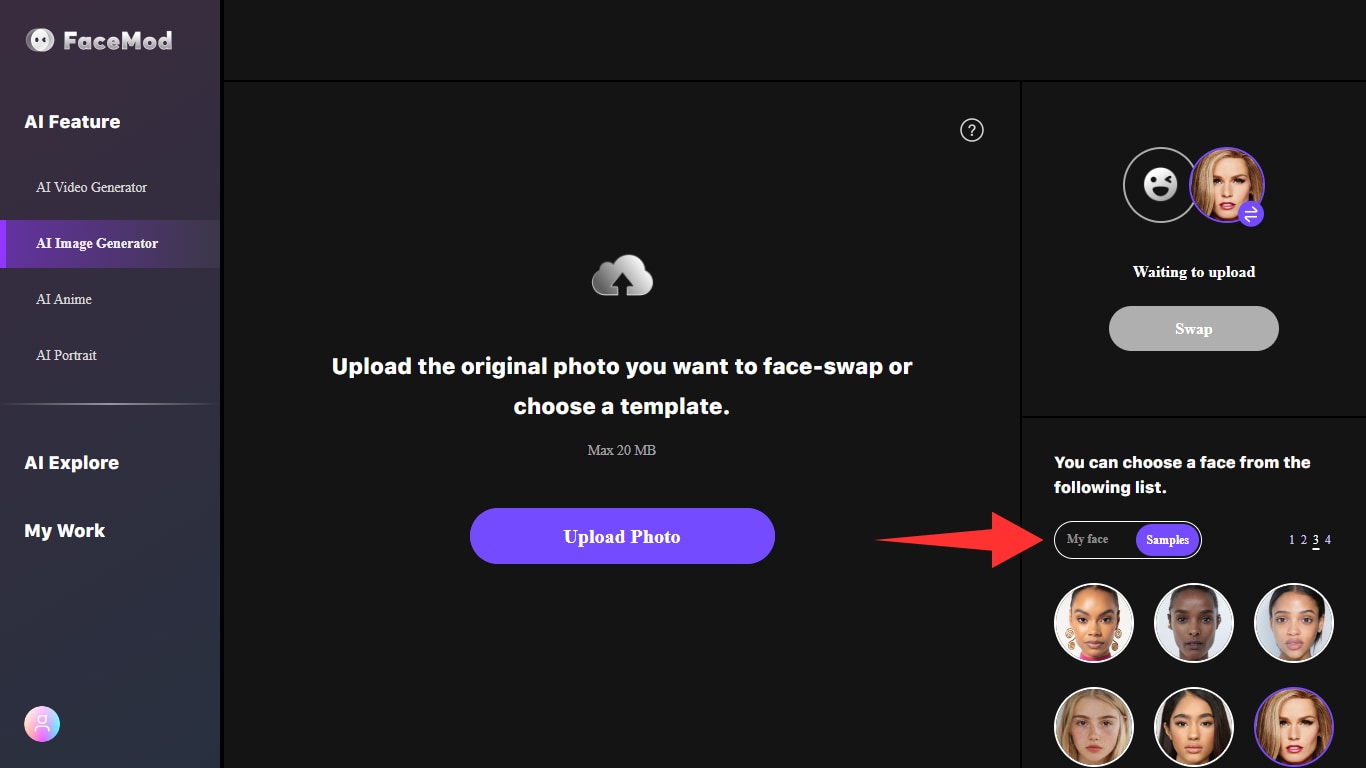
Step 3. Now, click on “My face” near the bottom right side of the page. Upload the picture of your face to swap with the uploaded picture. You can also select a face from various “Samples.”
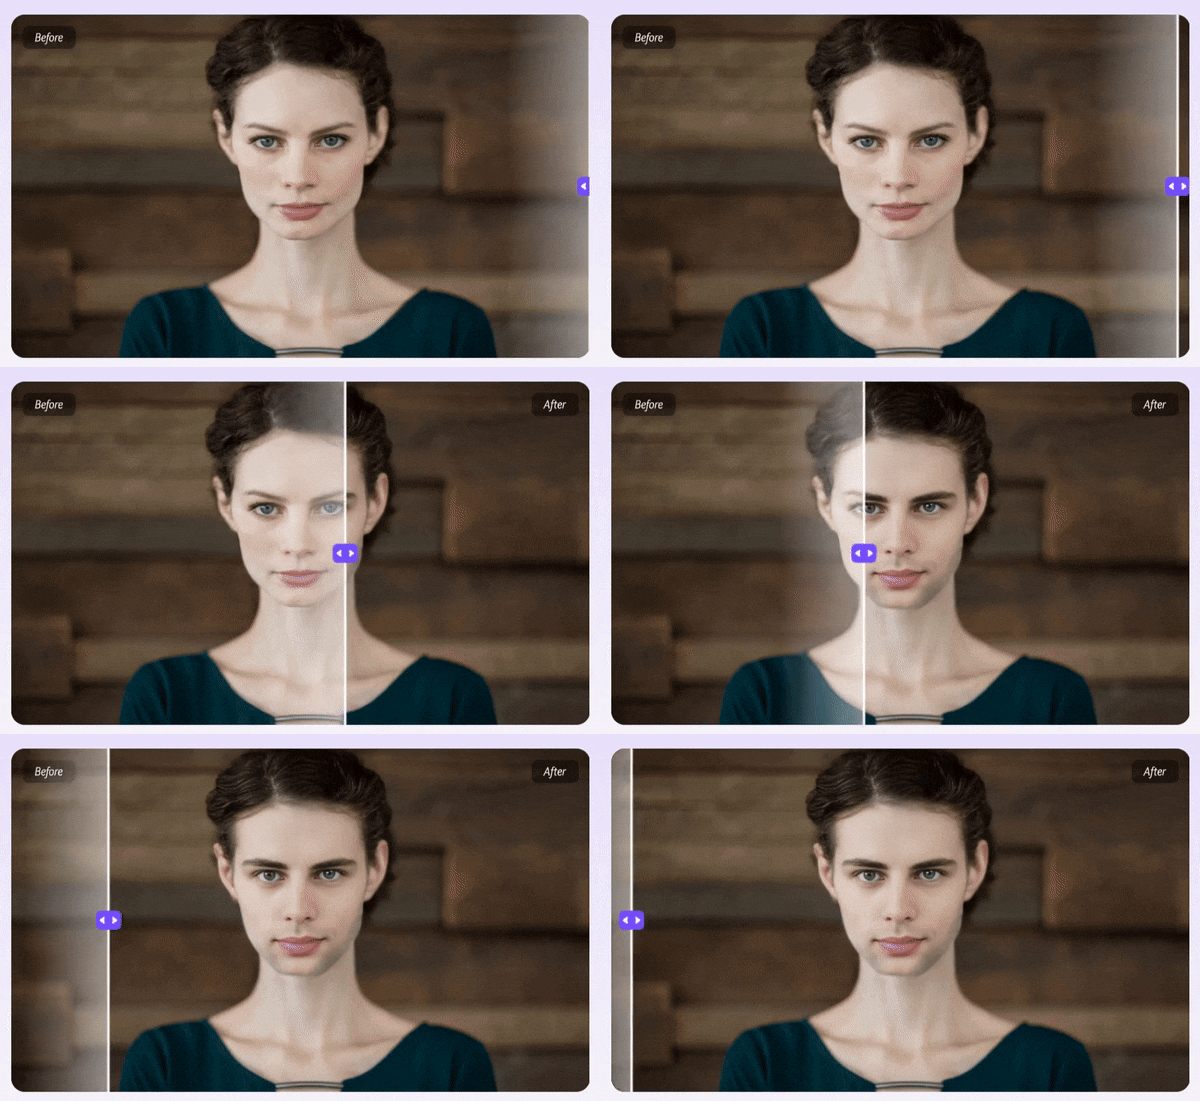
Step 4. Click on “Swap” to place the opposite gender face in your uploaded photo. Once the process is complete, click on “Download” to save your new photo to your device.
Step 5. If you don’t have a source photo to swap your gender, you can use FaceHub’s AI Portrait tool. Select the “AI Portrait” from the left panel and choose the template you want to use.
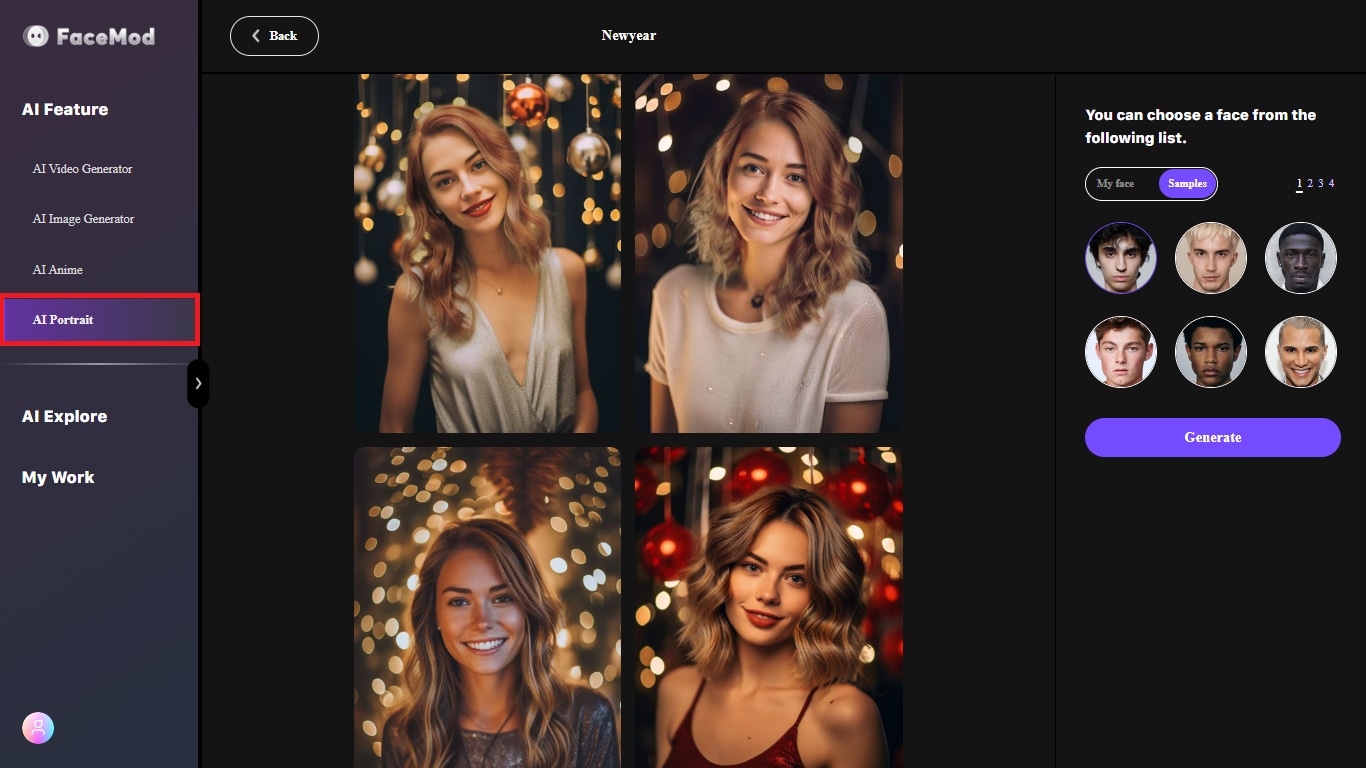
Step 6. Select a face from “Samples” or upload your picture using “My face.” Then, click on “Generate” to automatically place your face over the main photo.
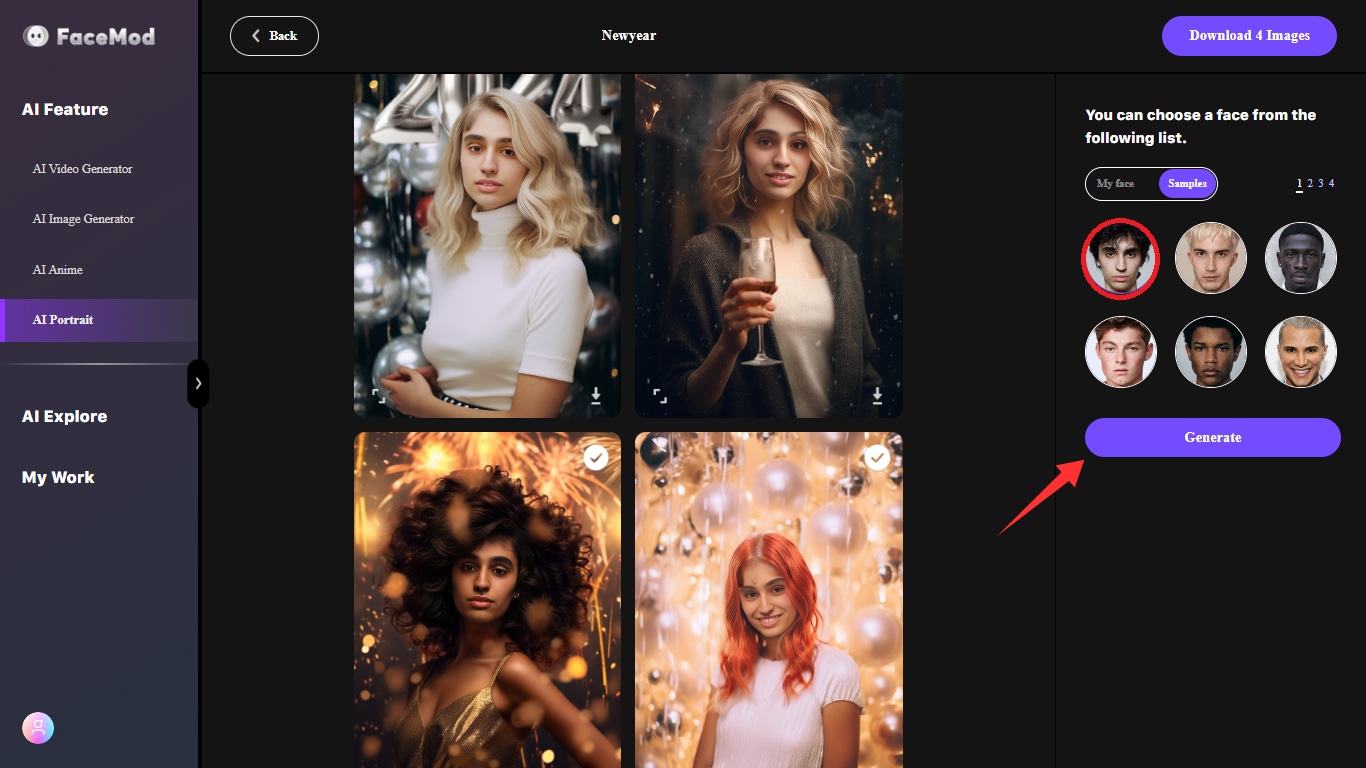
That’s it! Now you have successfully gender-swapped a photo with FaceHub. Download your photos and have a blast sharing them with a friend! Now, let’s look at the pricing of FaceHub’s powerful features.
What is FaceHub’s Pricing
Most of FaceHub’s features are free to use. You can use various free templates to gender-swap photos and videos and freely download them to your device. If you want to upload your own photos and videos, FaceHub offers cost-effective monthly and annual plans.
- Monthly Plan: $9.99 / month
- Annual Plan: $39.99 / year
Conclusion
Gender Swap with Photoshop is a fun way to explore another version of you. You can share your gender-swapped photos on social media and with friends for fun.
When it comes to Photoshop’s gender swap capabilities, they can be too intricate to handle. Beginners may find it hard to navigate the app. Plus the manual editing for gender swap can be tiresome.
That’s why tools like FaceHub come into play. FaceHub is not only fast but also highly accurate with its powerful AI technology. Try FaceHub and explore the endless ways for self-expression with stunning photo and video gender swaps. Still have questions about gender swaps? See if our FAQs help you out.
